The Expert’s Guide to Aluminum Anodizing: Type II vs. Type III Hardcoat & Color Matching
By The CNMP Expert Team
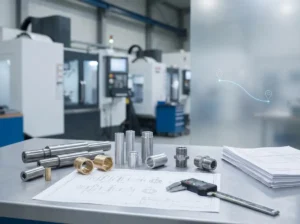
You’ve machined a perfect Aluminum 6061 part. It’s shiny, precise, and within tolerance. Now you need to make it durable and beautiful.
Enter Aluminum Anodizing.
It is the most common finish in CNC manufacturing, yet it is also the most misunderstood. Engineers often treat it like paint—expecting perfect Pantone matching and zero dimensional change.
The Reality: Anodizing is an electrochemical process that grows a ceramic layer out of the metal itself. It changes the dimensions of your part, and its color is influenced by the alloy’s chemistry.
In this guide, we dive deep into the science of aluminum anodizing, comparing Type II (Standard) vs. Type III (Hardcoat), and revealing the shop-floor secrets to getting perfect results.
What is Aluminum Anodizing? (The Science)
It’s not a coating; it’s a conversion.
The Materials Scientist:
“Aluminum anodizing is essentially ‘controlled rusting.’ We submerge the aluminum in an acid electrolyte bath and pass an electric current through it. This forces the surface aluminum to oxidize, forming Aluminum Oxide (Al2O3).
Unlike paint which sits on top, this oxide layer is fully integrated with the underlying aluminum substrate, making it impossible to peel or chip.”
The Machinist:
“Here is the tricky part for us: Anodizing adds thickness.
- 50% Penetration: Half the layer grows into the part.
- 50% Growth: Half the layer grows out of the surface.We must machine the part slightly smaller to account for this growth, especially for tight bearing bores.”
The Big Debate: Type II vs. Type III
Cosmetic vs. Industrial.
This is the question we get: “Do I need Hardcoat?”
Type II: Standard (Sulfuric) Aluminum Anodizing
- The Look: Available in virtually any color (Red, Blue, Gold, Black, Clear). The finish is satin or matte.
- Thickness: Thin. Typically 5 – 25 microns (0.0002″ – 0.001″).
- Hardness: Moderate. Good for scratch resistance but can be scratched by a knife.
- Best For: Cosmetic parts, consumer electronics, brackets, prototypes.
- Cost: $
Type III: Hardcoat Aluminum Anodizing
- The Look: Industrial. Usually Dark Grey or Black.
- Note: Because the coating is so thick and dense, it has a natural dark grey/bronze tint. You cannot dye Hardcoat “bright yellow” or “clear”—it will always look muddy.
- Thickness: Thick. Typically 25 – 75 microns (0.001″ – 0.003″).
- Hardness: Extreme (60-70 Rockwell C). Harder than tool steel. A file will slide off it.
- Best For: Gears, pistons, sliding rails, robotics, extreme wear applications.
- Cost: $$ (Requires higher voltage and colder tanks).
Visualizing the Difference (Type II vs III)
Seeing the cross-section explains the durability.

The “Color Matching” Trap
Why “Pantone 123C” is a suggestion, not a rule.
The Shop Floor Reality:
“Anodizing is an organic process, not a digital print. The final color depends on:
- The Alloy: Aluminum 6061 anodizes differently than 7075. 7075 has Zinc, which can turn the color slightly yellowish or inconsistent.
- The Bath: Temperature, pH, and time in the tank all affect the shade.
- The Dye: Anodizing dyes are absorbed into the pores. It’s like dyeing fabric. There will be slight variations between batches.”
Expert Advice:
“If you need 1,000 parts to match perfectly, anodize them all in one batch. If you split the order into two months, expect a slight shade difference.”

The “Rack Mark” (The Unavoidable Blemish)
You can’t defy gravity.
To anodize a part, we must hold it in the tank and pass electricity through it. We clamp it onto a Titanium Rack.
- The Mark: Where the rack touches the part, the anodizing solution cannot reach. This leaves a small contact mark (usually a tiny silver spot or scratch).
- The Solution: You must tell us where to rack the part!
- Bad: “Rack anywhere.” (We might rack on a critical sealing face).
- Good: “Rack inside the threaded hole” or “Rack on the back face.”

Summary Matrix: Choosing Your Anodize
| Feature | Type II (Standard) | Type III (Hardcoat) |
| Primary Use | Decoration / Mild Protection | Wear Resistance / Electrical Insulation |
| Thickness | ~15 microns | ~50 microns |
| Colors | Unlimited (Clear, Black, Red, Blue…) | Limited (Black, Dark Grey, Olive) |
| Tolerances | minimal impact | Must account for growth! |
| Cost | Low | Medium |
“Confused about other finishes like Plating or Passivation? Return to our Ultimate Guide to Surface Finishes.”
Expert Advice: Designing for Aluminum Anodizing
- Account for Growth: If you choose Type III Hardcoat, tell the machinist before we start cutting. We need to offset the CNC program by -0.025mm per side.
- Hide the Rack Mark: Design a threaded hole or a hidden surface specifically for racking.
- Masking: If you need a specific area (like a grounding point) to remain conductive, we can mask it. But masking adds manual labor cost.
Ready to start?
At CNMP, we offer Mil-Spec aluminum anodizing in Type II and Type III.
Contact us to discuss your color and thickness requirements.